I mostly Blog about ML, Deep Learning, Python, Natural Language Processing and Image Processing or anything awesome happening in the area of Artificial Intelligence. You can reach me at kuldeepsinghsidhu.com or at directly singhsidhukuldeep@gmail.
A convolutional neural network (CNN) is mainly for image classification. While an R-CNN, with the R standing for region, is for object detection. ... It is actually possible to regress bounding boxes directly from a CNN but that can only happen for one object at a time.
Mask RCNN is a deep neural network aimed to solve instance segmentation problem in machine learning or computer vision. In other words, it can separate different objects in a image or a video. You give it a image, it gives you the object bounding boxes, classes and masks.
There are two stages of Mask RCNN. First, it generates proposals about the regions where there might be an object based on the input image. Second, it predicts the class of the object, refines the bounding box and generates a mask in pixel level of the object based on the first stage proposal. Both stages are connected to the backbone structure.
What is backbone? Backbone is a FPN style deep neural network. It consists of a bottom-up pathway , a top-bottom pathway and lateral connections. Bottom-up pathway can be any ConvNet, usually ResNet or VGG, which extracts features from raw images. Top-bottom pathway generates feature pyramid map which is similar in size to bottom-up pathway. Lateral connections are convolution and adding operations between two corresponding levels of the two pathways. FPN outperforms other single ConvNets mainly for the reason that it maintains strong semantically features at various resolution scales.
A regular object detection model requires you to annotate the object in an image using a bounding box. However the input for a mask model is a PNG file with masks. See example below:
Object Mask — Toy
With this binary mask image, the model can extract both the coordinates of the bounding box as well as the pixel wise location of the object.
The tool I used for creating masks is Pixel Annotation Tool. The output from this tool is the PNG file in the format that the API wants. You can open the image in the annotation tool and use a brush to “color” the toy. It is also important to color the outside and mark it as outside the region of interest. It took me about 20 seconds to color and save each mask image which isn’t too bad. If you want the masks to be very accurate then use a fine brush at the edges. Through my experimentation, I observed that training a Mask RCNN model requires fewer images than training a Faster RCNN model to get to the same accuracy.
2. Generating TF Records
The input to a Tensorflow Object Detection model is a TFRecord file which you can think of as a compressed representation of the image, the bounding box, the mask etc so that at the time of training the model has all the information in one place. The easiest way to create this file is to use a similar script available for TFRecord for Pets dataset and modifying it a bit for our case. I have shared the script I used on my Github repo.
You will also need to create a label.pbtxt file that is used to convert label name to a numeric id. For my case it was as simple as
item {
 id: 1
 name: ‘toy’
}
3. Selecting Model Hyper Parameters
Now you can choose the Mask Model you want to use. The Tensorflow API provides 4 model options. I chose the Mask RCNN Inception V2 which means that Inception V2 is used as the feature extractor. This model is the fastest at inference time though it may not have the highest accuracy. The model parameters are stored in a config file. I used the config file for the coco model of the same type and updated the number of classes and the paths keeping most of the model parameters the same.
4. Training the model
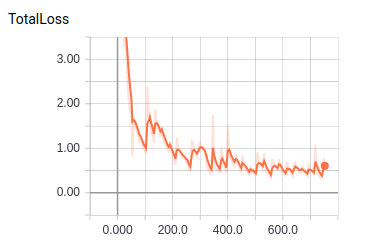
With the input files and the parameters locked, you can start the training. I was able to train this model on a CPU in a few hours. You can start the training job and the evaluation jobs on two separate terminals at the same time. And initiate tensorboard to monitor performance. I stopped training when I saw the loss plateauing.
The coolest thing in Tensorboard is that it allows you to visualize the predictions on sample images from test set as training progresses. The gif below shows the model becoming certain of its mask and bounding box predictions as the training progresses.
5. Test the model on your custom video
To test the model, we first select a model checkpoint (usually the latest) and export it to a frozen inference graph. The script for this is also on my github. I tested the model on a new video recorded on my Iphone. As in my previousarticle, I used the Python moviepy library to parse the video into frames and then run object detector on each frame and collate results back into the video.
You can also find me on linkedin. I’d love to hear from you if I can help you or your team with machine learning.


Comments
Post a Comment